

Technology Resources

Welcome to the Technology Resources page! Here you'll find helpful guides, instructions, and troubleshooting tips for common technology used at River Mill Academy. These resources are designed to help students and staff solve common issues, learn how to use school technology, and find quick answers when they need assistance.

How to Check for Windows Updates


1. Open Settings
Click the Start button at the bottom of the screen, then click ⚙️ Settings.
Shortcut: You can also press Windows key + I on the keyboard.
2. Open Windows Update
In the Settings window, click Windows Update on the left side.
Windows 10: You may need to select Update & Security, then Windows Update.
3. Check for Updates
Click the Check for updates button.
Windows will search for available updates.
4. Install the Updates
If updates are available, allow Windows to download and install them.
You may see messages such as:
-
Downloading
-
Installing
-
Pending restart
5. Restart the Computer
If Windows displays Restart now, save anything you are working on and click Restart now.
⚠️ Important: Don't turn off the computer while updates are installing.
6. Check Again
After the computer restarts, return to:
Settings → Windows Update → Check for updates
Repeat this until Windows says You're up to date.
River Mill Academy Tech Tip: If you're troubleshooting a computer problem, checking for and installing Windows updates is a good first step.
Change Your Display Settings in Windows


If your computer is connected to a projector, SMART Board, TV, or second monitor, Windows allows you to control what appears on each screen.
1. Open Display Settings
Right-click an empty area of your desktop and select Display settings.
2. Find Your Display Options
Scroll down to Multiple displays.
Look for the menu that controls how your computer uses the connected displays.
3. Select Duplicate
Choose Duplicate these displays if you want your computer screen and the classroom display to show the same thing.
This is usually the best setting when presenting to a class.
Other Display Options
Extend these displays — Gives you additional desktop space. You can have different windows on each screen.
Show only on 1 — Uses only Display 1 and turns off the other display.
Show only on 2 — Uses only Display 2 and turns off the other display.
⚡ Quickest Method: Windows + P
Press Windows Key + P on your keyboard.
A display menu will appear. Select:
Duplicate — Same image on both screens.
You can also choose Extend, PC screen only, or Second screen only from this menu.
💡 Teacher Tip
If something is showing on your laptop but isn't appearing on the SMART Board or projector, your computer may be set to Extend.
Press Windows + P → Duplicate to quickly make both screens show the same thing.
SMART Board Connection Help Sheet:
What to Do If Your Computer Won't Connect to the SMART Board
-
SMART Settings / Hardware Settings — includes screenshots showing where to open SMART Settings and how the connected SMART Board appears. SMART Settings & Hardware Settings
-
SMART Pen Settings — includes several screenshots of SMART Settings, the detected SMART Board, and pen controls. This is probably the best visual page for your guide. SMART Board & Pen Settings
-
SMART Ink Settings / Troubleshooting — shows where to access SMART Ink troubleshooting and explains the checks it performs. SMART Ink Troubleshooting
-
SMART Product Update — official instructions for opening Product Update, clicking Check Now, and installing available updates. SMART Product Update instructions
-
SMART Connection Wizard — useful if the board still isn't being detected after checking USB and restarting. SMART Connection Wizard
If your SMART Board is displaying your computer screen but touch, pens, or SMART Ink are not working, try the steps below.
1. Check the Physical Connections
Before changing any settings:
-
Make sure the SMART Board is powered on.
-
Make sure the USB cable from the SMART Board is connected to your computer.
-
Make sure your HDMI/display cable is connected if you are also having trouble displaying your screen.
-
Disconnect and reconnect the USB cable.
-
Wait about 30 seconds to see if Windows recognizes the SMART Board.
Important: HDMI sends the picture to the SMART Board. The USB connection is what allows the board to communicate with your computer for touch and pen controls.
2. Restart Your Computer
If everything is connected correctly but the SMART Board still isn't responding:
-
Leave the SMART Board connected.
-
Restart your computer.
-
After logging back in, wait a minute for the SMART software to load.
-
Test the board again.
3. Open SMART Product Update
If the board still isn't working, check that your SMART software is up to date.
-
Click the Windows Start button.
-
Search for SMART Product Update.
-
Open SMART Product Update.
-
Allow it to check your installed SMART software.
-
Install any available updates for:
-
SMART Product Drivers
-
SMART Ink
-
Other installed SMART components
-
-
Restart your computer if prompted.
4. Open SMART Settings
After updating:
-
Click the Windows Start button.
-
Search for SMART Settings.
-
Open SMART Settings.
-
Look for the connected SMART Board/display.
-
Verify that SMART Settings recognizes the board.
If the SMART Board appears, test the touchscreen and pens.
5. Check SMART Ink
If touch works but you cannot write or use the SMART pens:
-
Search Windows for SMART Ink.
-
Open SMART Ink.
-
Make sure SMART Ink is running.
-
Try writing on the SMART Board again.
Still Not Working?
Please contact IT rather than uninstalling SMART software or changing advanced settings.
When reporting the problem, please include:
-
Your room number
-
Whether the SMART Board displays your computer screen
-
Whether touch works
-
Whether the pens work
-
Any error messages you see
-
SMART Settings / Hardware Settings — includes screenshots showing where to open SMART Settings and how the connected SMART Board appears. SMART Settings & Hardware Settings
-
SMART Pen Settings — includes several screenshots of SMART Settings, the detected SMART Board, and pen controls. This is probably the best visual page for your guide. SMART Board & Pen Settings
-
SMART Ink Settings / Troubleshooting — shows where to access SMART Ink troubleshooting and explains the checks it performs. SMART Ink Troubleshooting
-
SMART Product Update — official instructions for opening Product Update, clicking Check Now, and installing available updates. SMART Product Update instructions
-
SMART Connection Wizard — useful if the board still isn't being detected after checking USB and restarting. SMART Connection Wizard
☁️ Microsoft 365 & OneDrive


Students Should Use Microsoft 365 Online
River Mill Academy students should use the online versions of Microsoft 365 for Word, PowerPoint, Excel, and other Microsoft applications.
Students should:
-
Open Chrome or Microsoft Edge.
-
Go to Microsoft365.com.
-
Sign in using your River Mill Academy Microsoft account.
-
Use the online versions of Word, PowerPoint, Excel, and other available applications.
-
Save and organize your schoolwork in OneDrive.
A Simple Rule
Microsoft 365 Online + OneDrive
💾 Save Your Schoolwork in OneDrive
Your school laptop should not be the only place where important files are stored.
School laptops occasionally need to be repaired, reset, or replaced. Files stored only in folders such as Downloads, Documents, or Desktop could be lost.
Files saved in OneDrive are connected to your school Microsoft account and can be accessed from another computer after you sign in.
📥 What Happens When You Download a File?
When you download a document, picture, PDF, PowerPoint, or other file from the internet, Canvas, email, or another website, it will usually be placed in your computer's Downloads folder.
Do not assume that a file in Downloads is backed up.
If it is something you need for school, move it into your OneDrive.
📂 How to Move a Downloaded File to OneDrive
1. Open File Explorer
Click the File Explorer folder icon on the Windows taskbar.
You can also press:
Windows Key + E
2. Open Your Downloads Folder
In File Explorer, select Downloads from the left side of the window.
Find the file you want to keep.
3. Find OneDrive
On the left side of File Explorer, look for OneDrive.
It may appear as:
OneDrive – River Mill Academy
or with your school/organization name.
4. Move Your File
You can move the file using either method:
Drag and Drop:
Click and hold the file in Downloads, drag it onto your OneDrive folder, and release it.
Cut and Paste:
Right-click the file and choose Cut. Open your OneDrive folder, right-click inside the folder, and choose Paste.
5. Organize Your Files
Don't put everything into the main OneDrive folder.
Create folders for your classes or schoolwork, such as:
OneDrive
-
English
-
Math
-
Science
-
Social Studies
-
ACC Courses
-
Projects
Then move downloaded files into the appropriate folder.
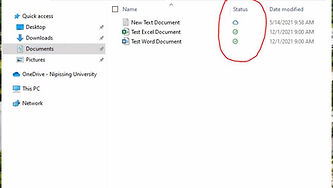
☁️ Make Sure Your File Has Synced
After moving a file into OneDrive, Windows will begin syncing it to your Microsoft account.
You may see status icons next to your files:
☁️ Cloud — The file is stored in OneDrive and can be downloaded when needed.
✅ Green check — The file is available on your computer and is also synced with OneDrive.
🔄 Circular arrows — OneDrive is currently syncing the file.
If you see a red X or other error symbol, the file may not have successfully synced.
Before You Close Your Laptop
If you just moved an important assignment into OneDrive, give OneDrive a moment to finish syncing before shutting down your computer.
🔍 Check That Your File Is Really in OneDrive
For important assignments, you can verify that your file was successfully saved.
-
Go to Microsoft365.com.
-
Sign in with your school account.
-
Open OneDrive.
-
Find the file or folder you just saved.
If you can see the file there, it is stored in your OneDrive account and isn't dependent on that particular laptop.
⚠️ Downloads Is Not Permanent Storage
A good habit is to periodically open your Downloads folder and clean it out.
For each file, ask:
Do I need to keep this?
YES → Move it to OneDrive.
NO → Delete it.
This keeps your laptop organized and protects important schoolwork.
⭐ The Rule to Remember
If it's important, put it in OneDrive.
Don't leave your only copy of an assignment in Downloads, Documents, or on the Desktop.
I think this would also be a great place for 3–4 actual Windows screenshots: File Explorer → Downloads → OneDrive → OneDrive sync icons. That would make the directions much easier for students to follow.

If the SMART Board responds when you touch it, but the cursor appears somewhere other than where you are touching, the board may need to be aligned (or oriented).
Steps to Align the SMART Board
-
Click the SMART Board icon in the Windows system tray near the clock.
-
Open SMART Settings.
-
Select SMART Hardware Settings.
-
Open the Orientation/Alignment Settings.
-
Select the desired precision level and click Orient.
-
A series of crosshair targets will appear on the SMART Board.
-
Using your finger or a SMART Board pen, carefully press the center of each target.
-
Lift your finger or pen after each target registers and moves to the next location.
-
Continue until all targets have been completed.
The orientation screen should close automatically when you are finished.
💡 Tech Tip
Take your time and touch the exact center of each crosshair. The more accurately you select the targets, the more accurately the SMART Board will respond to touch.
If the board still isn't tracking your touch correctly afterward, try running the orientation process again.
